Blog

The Original Professional Engineering Crack Gauge Business Card: A 15-Year Legacy of Innovation At CEL innovation has always been at the heart of what we do. Fifteen years ago, we pioneered a unique idea: integrating a practical crack gauge into the design of our business cards. This wasn’t just a gimmick, but a thoughtful addition and a solution born from our early planning to make our business cards more than just contact information. From our call to action "How may we help you?" run up the right hand side, to the use of a bright yellow in order to be able to leave cards in place as tell-tales to save clients costs, we wanted to set ourselves apart as the pragmatic problem solvers we set out to be. We envisioned these cards as tools that engineers, contractors, and property-interested parties could carry in their wallets, ready to assist them in seeking our structural advice on the spot. The Origin Story Back in 2010, our team brainstormed ways to stand out in the competitive engineering industry. We wanted our business cards to reflect our commitment to practical, problem-solving innovation. The crack gauge was the perfect fit—a compact, functional tool that embodied our expertise in structural analysis and our dedication to providing value beyond expectations. After months of design and testing, we launched the first crack gauge business card, a concept that was entirely novel at the time. A Global Influence Over the past decade and a half, our crack gauge business cards have gained recognition worldwide. From our staff attending the ICCRRR International Conference on Concrete Repair, Rehabilitation and Retrofitting in Leipzig Germany through to attending Restoration, Seismic, and Engineering conferences in Japan, Italy, France, New Zealand, and the USA, our little idea has travelled far and wide. Companies in Germany, France, South Africa, New Zealand, and Australia have adopted similar designs, inspired by our original idea. We’re flattered by the global reach of our concept, but we’re also proud to set the record straight: Capacity Engineering was, to the best of our knowledge, the first to bring this idea to life. The Most Recent Imitation Recently, we’ve noticed a local Canadian competitor incorporating crack gauges into their business cards, positioning themselves as innovative. While imitation is the sincerest form of flattery, we believe it’s important to celebrate the true origin of this idea; a backyard and a beer, 2010, with the birth of CEL. For 15 years, our crack gauge business cards have been a hallmark of our brand, trusted by clients and imitated by other professionals, worldwide. This latest instance marks the first time a Canadian firm has followed suit, joining a line of international engineering firms inspired by our work. Why It Matters Our crack gauge business card is more than a marketing tool, but is in fact a testament to our commitment to innovation, functionality, simple solutions, economic results, and quality that maximises value. There is often little need for expensive monitoring and data collection. It can be as simple as a fractional cost of a dollar, and a free giveaway, conveniently placed on the back of the business card. Call to action? No; it is a call to simplification, and a way to offer clients more value out of our services. It is a reminder that true innovation isn’t just about creating something new; it’s about creating something that lasts, solves problems, and inspires others. We’re proud to have led the way and will continue to push the boundaries of what’s possible in our industry. Thank you to our clients, partners, and community for supporting us over the years. Here’s to 15 more years of innovation, and beyond. Reach out if you have a need; we're more than happy to help.

Sometimes you need five minutes, and not in two weeks...

Understanding that words matter.

To heat, or not to heat, that is the question...

Bad News Early Is Better Than Bad News Late

Stress, Strain, Steel, Plastic, Bondage, Finish, and Exposure

Nickel Sulphide Inclusions in Glass and Canadian Regulations

Three offices in as many years... Create · Enhance · Sustain(ing) our growth through Engineering Excellence...

Something is Rotten in the State of The Art...
Grammar aside, we do add value and safety...
If you're familiar with steel design, aluminum might just surprise you, and be a welcome technical challenge...

Basic, basics, and drainage - Oh my!

At 8:30 EDT, we were notified we had a new P.Eng. on staff...

Discounted Forensic Engineering for Ottawa...

Engineering the past, Engineering of the past, and the passing of a very fine Engineer...

Avoid the most common pitfalls...

Limits, estimation, sarcasm, and what we do...
What happens when your engineer refuses to look at something?

When your infrastructure allows you to be anywhere...
Fenestration Canada – Field Testing of Fenestrations The presentation we gave at WinDoor 2022 in Montreal contained the core of our philosophy regarding the testing of fenestration products, and I wanted to repeat this here. We take a very simple approach to such work. This can be broken down as follows: 1. We work within the code. 2. We apply the code referenced standards. 3. We run the test in accordance with those standards. 4. We interpret the results. 5. We diagnose and describe issues. 6. We propose possible causal factors. 7. We propose possible solutions. What don’t we do? i. We never test without calibrated, purpose made, equipment. ii. We don’t test assemblies that aren’t ready (very dirty, blocked weeps, etc.). iii. We don’t fail and walk away. IE: We try to actually find the cause, not just state “you fail”. iv. We provide reports that contain clear explanations, detailed descriptions, and attempt to help the overall successful delivery of the project. v. We look for opportunities to work towards real resolutions, and to limit further failure(s). What is the basis of our work? One word: Understanding. We need to understand the design of your building envelope in order to test it correctly. We need to review the details and be involved in the planning of testing. Not every day is a good day to test, not every assembly should be tested in the same way. We want to prepare a test program that is code and contract conformant that maximizes the accuracy of the test. We want fairness and transparency, not speed and a cookie-cutter repeat of previous testing. I’m told that our presentation will be made available online; I look forward to sharing it with you all. In the meantime, please feel confident that when you reach out to our team for Window Installation Testing to ASTM E1105 under CAN/CSA A440 and the supplement, you’re getting a bespoke product that will serve your needs. We want to be your ally; we will make sure that your installers get the best possible support, that the test isn’t simply a “you failed, better luck next time”, that the project doesn’t mire in the weeds for weeks and months as people point fingers. No; we will work for you, and bring a diligent approach and produce success. Give us a try: We will test for you, we won’t be looking to fail you.
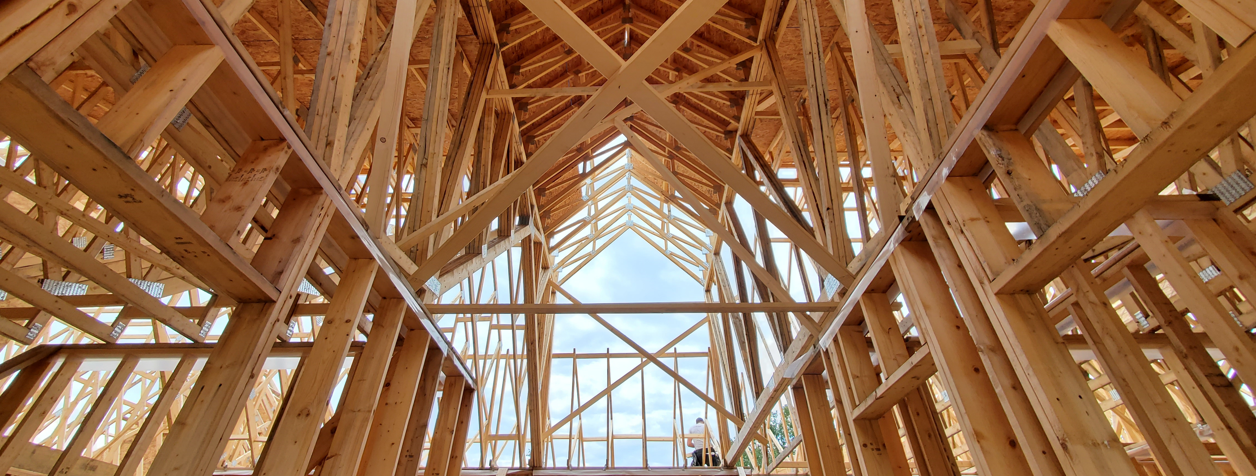
Shop Drawings, Seismic Systems, and the Construction Process – The importance of detailing and reviews Really? October, and suddenly we have a new Blog post? Must be the end of the busy season… Unfortunately, like weather, there is a distinct seasonality to Structural Engineering in Canada I digress; today’s post is about detailing and shop drawing procedure. Let’s use a seismic system as an example. These are designed by the Engineer of Record (EOR), often subject to component design (such as the connections for a steel frame), and ubiquitous. Every building has a lateral load resisting system, whether this is primarily to address wind loads, or designed to handle both wind and seismic separately, each building has some way of handling the loads that push on our buildings from the side, or “laterally”. These are the Lateral Loads Resisting Systems (LLRS) of buildings, and they come in many forms. Sometimes they are as simple as timber framing with a steel strap or let in brace running diagonally down the wall, as easy as fastening on a sheathing system (timber or gyprock are both possible, and often mixed), or as complicated as tuned mass dampers and energy dissipating devices. All buildings are constructed with an LLRS of some kind. So what happens when loads travel where they don’t belong, or where the Engineer of Record (EOR) didn’t intend for them to go? Well, quite possibly nothing, but also quite possibly this may have disasterous consequences. Every building should have a discrete, reliable, well constructed and maintained LLRS handling the lateral loads. This starts with the design process, but must be cared for throughout construction and in service. Everything from the way in which the staircases are constructed and installed within the building through to the running of mechanical pipes and the installation of drywall, indeed even the delivery of some furniture, may have a serious impact on the LLRS during construction or thereafter. So what do we do? How do we ensure that the EOR’s design intent is reflected in what is constructed? Well, this is the role of Shop Drawings; the intent of others designing components for the building is to be shown on a set of engineering drawings created for those components, simply termed “Shop Drawings” as they are the drawings for components being produced in a fabrication shop. Seems simple, but a great deal of things can go wrong. Many disasters may be traced back to mistakes made during the shop drawings process. The Kansas City Hyatt skywalk collapse comes to mind immediately. As an EOR, we have no choice but to review the work of anyone providing components to our project, and ensure that appear to be based on an understanding of our structure’s requirements and are likely to meet the intent of our design. We aren’t perfect, and everyone makes mistakes, but by working together in a clear and open process, mistakes are minimized, and many lives of unsuspecting members of the public are saved. So what makes for a good shop drawing process? Well, this is founded upon everyone taking their role seriously and ensuring that those areas of work they are responsible to undertake and review are covered off properly. While this differs somewhat in various jurisdictions, generally they follow a regimented process. In Canada that looks like this: 1. The component designers use the project’s drawings and specifications to come up with their design. They represent these on Shop Drawings (SD) they produce. 2. The Constructor reviews the SDs, paying special attention to field measurements and constructability. They apply their SD approval seal and send them to the Architect. 3. The Architect confirms that the SDs will produce work which meets the intent of their design, for aesthetics (form), function, durability, and generally match their intended size and massing (dimensions check). They apply a review seal (not relieving the Constructor of their obligation to meet the requirements of the D&S), and send these to the respective Engineer (by discipline for each component type). 4. The Engineer (for structural elements, the EOR) reviews the SDs for compliance with the intent of the design, and seals them as being reviewed. For all parties, these reviews come in flavours: i. Reviewed [ie: Looks good and complies with my needs.] ii. Reviewed as Noted [ie. I made a few, typically minor, annotations; document complies with my needs so long as these are incorporated.] iii. Revise and Resubmit [ie: Please try again.] iv. Reviewed in Part [NB: Generally a partial comes with explanations.] v. Not Reviewed [NB: This time I would say the lack of review is invalid without explanation.] Turn Around Time: Ah, the magic of everyone wanting their answers yesterday. While these vary by contract, generally speaking people are afforded between three and seven working days to complete their reviews. Erroneous, incomplete, or otherwise problematic SDs can have massively negative impact on projects. They are important and serious documents which are frequently afforded too little attention in construction practice. That’s it; while it seems simple and straight-forward, a careful attention to detail (pun intended) is required. In our practice, we try to make sure that the Shop Drawings are reviewed by at least two people, following again our Second Set of Eyes (SSoE) procedure to further safeguard both life and property. Even with a robust SSoE procedure, errors and omissions can escape the attention of even the best team. If you remember but one thing from today’s post, let it be this: In absence of an SSoE system, you’re flying blind, and your paper airplane is going to be taken down by little more than the ink on the page… Because for our ink, the consequences of error are girded by steel and written in stone.
R.E.S.P.E.C.T. – How much does an Engineer’s input mean? Recently we’ve seen a push to move more of the engineering work onto the truss industry, or broadly speaking the lumber yards, who supply pre-engineered joists (generally APA-PRI series timber i-joists). Seems cheaper, right? After all, they often provide the designs of engineered elements for free… Well, like most things in life, it isn’t that simple. It is an open secret within the engineering community that truss plates have problems. They can work their way out, they are a natural weak spot in the assemblies, and they are notoriously poor performers when subject to inappropriate handling on site. They also represent significant savings, and will continue to grow into more and more areas of timber frame construction, now even including studs. But is this trend truly to the benefit of most clients? To us it is in fact yet another example of needing to ensure the tool fits the task. When reviewing shop drawings for a recent project, it was quickly noted that the steel beam sizes we designed had been swapped out to LVL by the lumber yard. That in an of itself was not strange, they are simply offering an option and trying to increase their sales after all, but this time came with a difference. The yard had annotated our drawings and stated that our beams would deflect excessively. We take such situations very seriously. A second Senior Engineer was assigned to the file, and a thorough review was undertaken. The intern responsible for the work* was called upon to explain and defend their design. The project documentation was reviewed, and the veracity, thoroughness, and correctness of the calculations and original Second Set of Eyes (SSoE) was challenged and confirmed. In short, our design was right. The matter was brought back to my desk, as I had been the original sealing engineer. I then had a better look at the work of the lumber yard. Turns out most of the new LVL sizes could, most charitably, be called “up selling”. In one case the new design had removed a column and resulted in a multi-ply 24″ deep (~600mm) LVL beam. That’s a heck of a lot of expensive timber, and particularly so when it is replacing a relatively light (and thus inexpensive) steel beam. Current pricing sees clients paying around $2.50 a pound for steel including the fabrication labour. An LVL beam just isn’t always the right choice. So what did our involvement in this project mean to the client? If we consider the balance of the project being the difference between what would have been purchased without our involvement and what has been purchased with our involvement, the client is paying approximately $12,000 less for the framing after our fees are paid. That’s not at all subtle. Now, clearly this is a larger home with exceptional spans, but the trend continues across many examples. Well engineered buildings have robust load paths, avoid issues which otherwise become all too common (ie: misuse of TECO “hanger” nails, galvanic corrosion, incomplete load paths, soft storey effects, etc.) and save the client time and money. We specify trusses, LVLs, i-joists, and all the products available at a lumber yard routinely. They are excellent products and surely have their place… But when you’re holding a hammer, everything looks like a nail, and the good and talented staff of your local lumber yard will only sell you products based on lumber. That’s a hell of a set of handcuffs to put on your project! So: What does an Engineer’s input mean? R eliability E conomy S afety P rofessionalism E xperience C onstructability T rust Like many options clients have before them, an engineer isn’t always the right tool to add to your project team, but if you’re doing something unique or new, you’ll be well served to bring a Professional Engineer on side.
Reserve Fund Studies – It’s all in the details Condominium residents are at the mercy of their building’s maintenance, and the Property Managers are at the mercy of the accuracy of the documentation and support they receive. Many people know that Reserve Fund Studies need to be updated every three years with every other study requiring a site visit. We commonly see reports that differ little from revision to revision, but worst of all we see short, high-level, and vague reports. Did you know that the usefulness of the study is entirely in the details? Condominium law has changed, and the regulations are catching up. The Government of Ontario has put out a good summary at https://www.ontario.ca/page/condominium-law-changes , but let’s discuss the most fundamental issues of all: No matter how your report is produced, every common element must have a detailed review which results in a well studied, clearly laid out, entry in the report. When choosing an Engineering Firm to provide you with a Reserve Fund Study, it is important to make sure you compare “apples to apples” in the quality of the study a firm will provide. The more detail in the study, the more accurately the Board, with help from their Property Manager, can assess what needs to be done and when. When matters. What matters. How matters. Do your reports give you enough clarity to know where your building is going? What about maintenance? Does your Engineering Firm recommend maintenance practices that will make your equipment and finishings last longer? This isn’t necessary in law, but it is certainly something an engineer experienced in maintenance, repair, restoration, and rehabilitation should be able to offer with little added effort. So why don’t they? What about assessments? Does your Engineering Firm account for having assessments done for large projects to ensure the scope of the project is accurate? Are there entries for forward planning those major projects? Those are important costs, aren’t they? Anyone living in a building with elevators knows how difficult it can be when an elevator isn’t working, so why do so few Reserve Fund Studies include a specialist review of the elevator condition and maintenance? This isn’t even one of the more expensive options, yet often the RFS engineering firm don’t even mention the possibility. What happens when TSSA (the Governing Authority) orders a directive to comply with a change to the elevator? Does your engineering firm take those costs into account? Are they shown in the RFS? They are routine, fairly predictable, and every RFS should have some realistic flexibility built in. Make sure you are getting all the information in your Reserve Fund Study that you truly need to keep your building running smoothly and efficiently with the proper funding. Want to see what a better study looks like? Reach out to us for your next Reserve Fund Study. Buying in a new condominium? Reach out to us and we can help you assess what costs you may be facing in addition to the sticker price.
CEL is growing – Time to Move! With consistent success, great clients, and steady growth come the twin problems of more people (just kidding) and cramped office space. As a result, we are delighted to announce that we are moving to new and larger offices at 2D-220 Terence Matthews Crescent, Ottawa. From starting in a small home office, expanding into a basement, through our shared office with other professionals, CEL has now found our very own home. Impacts on the Service you know and have come to rely upon Our goal is Zero Impact. We have a transition team in place, with staff available 24/7 just like always. We won’t, however, be scheduling meetings, replying to non-urgent emails, or welcoming clients in our offices on moving day. As such the office will be closed on July 30 th 2021, with our team officially reopening in our new home on August 2 nd 2021. Our office still continues to provide in-person services following all provincial COVID recommendations and guidelines. We look forward to welcoming you into our new offices, and wish to reassure you that urgent matters and existing client calls will be addressed throughout. Regards, CEL Team
Residential Earthquake Design In the current housing market, it is becoming more common that home owners are renovating their current properties into their dream homes instead of searching for new houses. Based on modern styles, this often means knocking out walls, and opening up the main floor so that cooking, socializing and other activities can go hand-in-hand. An often misunderstood part of this type of work is the impacts this has on the house’s ability to withstand earthquake activity. A basic understanding of the behaviour of a building in an earthquake, and some of our industry’s best practices to ensure public safety, can help home owners understand how our work in structural engineering may impact their next project. How do buildings behave in earthquakes? When an earthquake hits, it shakes the ground at the base of the building. The building will shake back and forth in an attempt to return its mass above ground to its initial position. Picture holding the bottom of a stick standing up with a heavy ball at the top of it. Shake the stick side to side. The ball at the top of the stick will rock back and forth in attempt to return to its initial position. If we break down this shaking into single motions, we can consider the impacts of the ball’s mass accelerating in one direction at a time. The same principle applies to the mass of a building on top of its ground floor framing. This acceleration imposes a horizontal sliding force onto the building. It will also attempt to overturn the entire building, similar to a slinky tipping over the edge of a step. We call this an overturning moment. This requires the building to resist pulling or uplift on one side, and crushing on the other. In houses, we can more specifically break down the impacts of these behaviours into 3 distinct considerations. Three Behaviours for Houses 1. Lateral Load Path The forces caused by the mass of the building rocking back and forth need to be transferred from very top to bottom through structural elements. This is done by providing a continuous load path down to the foundation. Where required, new structural elements are introduced to hold down the building to prevent both sliding and overturning. Picture placing your finger on the bottom ring of the slinky furthest from the edge. This will keep the whole slinky from tipping off of the step. Then, hold the next ring down in the same place. You can keep doing this until the entire slinky is held in place on the top step. In a building, these hold down points also need to be connected throughout its height to prevent any part from sliding or pulling away from what’s below. The bottom-most hold down points anchor into the building’s foundation using its own weight to prevent it from picking up out of the ground during an earthquake. The hold down points are connected by stacking them directly on top of each other from one storey to the next, with a post or wall in between. If one point does not stack on top of a wall directly below, the floor or ceiling can be designed to act as a horizontal diaphragm to transfer the forces to a wall close-by. Diaphragms in houses are usually a floor or ceiling with an increased number of fasteners used to hang the sheathing onto the joists. With more drywall screws into the ceiling joists, for example, the sheets of drywall are then able to transfer forces across the underside of the ceiling. Other sheathing materials can behave similarly, such as plywood and oriented-strand-board (OSB). Walls can also behave as vertical diaphragms using the same concept. 2. Soft storey effect Thinking back to our imaginary stick with the heavy ball, we need to consider what would happen if the stick supporting the ball was too weak. The stick would collapse under the acceleration of the rocking weight. The same idea applies to buildings. If the structure of the ground floor is not stiff enough, it will collapse under the weight of the rocking storeys above. This failure is also possible where the upper storey in a house is stiffer relative to the storey below. We can typically judge the relative stiffness of a given storey by its number and length of walls. The greater the number and length, the greater the stiffness. This is worth noting for newer projects with open concept ground floor layouts (lesser relative stiffness), and multiple smaller rooms on the floors above (greater relative stiffness). There are solutions for this: the shorter walls on the ground floor can be stiffened up, and the longer walls on the upper storeys can be softened. These two options can often be done without changing the floor layouts for the project. In previous projects we have successfully delivered this outcome by providing a short rocking shear wall for stiffening and strengthening on the ground floor, and creating separations within a long wall to soften the upper floor. 3. Torsional effect The torsional effect for a building is also related to its stiffness. And, same concept of a greater number and length of walls equals a greater relative stiffness applies here. However, instead of looking at the relative stiffness between storeys, in this case, we look at the relative stiffness between the two sides of the building. An important concept to understand is that stiffer elements within a system will attract more loading. During an earthquake, this means that the stiffer areas will take on more of the forces from the mass of the building shaking than the areas that are softer. If one side of the building is stiffer (with a greater number and length of walls), that side will attract the majority of the forces. With the forces then all on one side of the building, the building as whole will experience a twisting, or torsional, effect. To prevent this, the same strategies above to stiffen or soften different storeys of the building can be used. We use these to close the gap in stiffness between the two sides of the house so that they are the roughly equal. It’s a strange concept, but generally, we want the whole house to slide in one direction as a unit, and not twist on the spot. This way, in combination with the strategies above to prevent sliding, we can keep the building safe. It should be noted to those in the National Capital Area that the Ontario Building Code does not have prescriptive requirements for seismic design in residential structures. While the OBC is not well suited to addressing seismic concerns in the residential market, like all codes it is a legal minimum and an evolving document. We believe residential seismic requirements will be added to the OBC in the future, with British Columbia having added it to their Building Code and leading the charge in Canada. At CEL Ottawa we actively encourage clients to consider adding seismic considerations to their design process, whether for a new home design or for renovations. There are techniques available to provide supplemental detailing and compensating construction when removing lateral load resisting elements such that you may have your open concept ground floor and keep your building after an earthquake too. Contact our office for help with your next project.
Residential Basements – The Danger of Water and How to Deal with It Most homeowners, at one point or another, are forced to deal with water infiltrating into their homes. The sight of water trickling or visible signs of moisture in a basement are among the most unpleasant discoveries one can make at home, and often requires immediate action to prevent worsening conditions. Not all issues are severe and warrant intervention, however. So how do you make the distinction? What do you look for? And how do you know that your home was built (or is being built) properly? First of all, homeowners should be aware of one key clarification that pertains to a common misconception about basements: Your basement is not dry because it is waterproof, but because of the water management system that was incorporated into your foundation and adjacent areas. What does this mean? To put it as bluntly as possible – your basement is not a bathtub. The primary focus of your foundation walls, footings and slabs is not to restrict the infiltration of water, but to keep your structure safe and standing. All other concerns are secondary in nature. In other words, your foundation is not constructed in a manner that seals out moisture on its own. It needs the water management system to be well designed and constructed to keep your basement as dry as possible, because is it not waterproof. Water will invariably find its way into your home whether you know it or not. Behind the drywall, insulation batts, flooring and baseboard, most homes will show signs of minor signs of water infiltration. You may then ask yourself – can’t I build my home to be waterproof? Don’t I want it to be waterproof? The answer to both, in most cases, is no. The construction of your foundation is a multi-step process that inherently introduces seams and openings for water. Almost all modern homes in North America (regardless of cost and Constructor) have their foundations and basements built in a three-step process: Construction of the footings, on which your foundation walls sit; Construction of the foundation walls, which sit on and key into your footings; Construction of the basement slab, which sits on top of compacted soil and footings, between foundation walls. As these structural elements are not monolithic (they are three separately constructed elements, rather than one) in nature, each interface is an opportune location for water to flow in. For example, there (very likely) is a seam/joint between your foundation walls and foundation footings. There is another between your basement’s concrete slab and the walls, as well as a third between your basement’s slab and the footings underneath. The reason foundations are built in this manner? Cost and constructability. Monolithic construction introduces extreme pressures and loads onto the bottommost formwork due to the sheer volume of concrete being poured. Rather than using timber formwork, the Constructor would have to resort to using steel formwork with heavy-duty clips to ensure that the formwork does not blow out. This is typically cost-prohibitive for both the Constructor and Client. There are technical concerns as well – monolithic pouring of concrete, if used with rectangular formwork, will likely lead to air pockets and uneven distribution of material. Avoiding these technical concerns requires a substantial amount of effort on-site or sloping formwork that has been custom made, once again leading to elevated costs and difficulties. So why do we not want our basements to be completely waterproof? To plan for the worst possible case – flooding and rising water levels. Let’s set the scene and say (hypothetically) that your basement is completely waterproof and acts like a bathtub. No water flows into and out of your home, with exception of managed distribution networks and other municipal services. Now let’s introduce the culprits – rising water levels from the river or lake nearby, a major storm that has swept into the area, or broken sewage/sanitary piping beneath ground level. As water flows into and saturates the soils around your home, the water management system may become overwhelmed. The upward force exerted by the stagnant or rising water (buoyancy force) starts to work against the partially or fully immersed structure. As the water level increases the upward force increases, and your home, successfully resisting all water penetration, begins to float. It may not be like Noah’s Ark right away, but gradually the situation will worsen and lead to lasting damage. This has happened before, and it has happened many times. Your home is not immune to this scenario! It is for this reason that at a certain point, water is permitted to enter your home. It may be ugly and expensive to repair a finished basement following extensive water damage, but rest assured that repairs to a cracked and/or uprooted foundation come at an even greater inconvenience and cost. Modern (North American) construction methods are relatively successful in navigating water away from homes. Your home’s water management system will likely have most or at least some of the following elements, depending on its age and location. Weeping Tile A porous draining pipe, typically surrounding the exterior of a home’s foundation. It is buried in a trench filled with free draining backfill and diverts water away from the house or to a sump pump. Dampproofing & Waterproofing Membranes Dampproofing membranes are intended to keep soil and moisture out of your home. Waterproofing membranes helps keep moisture and liquid water out. These two membranes work together for maximum effectiveness. Dampproofing is usually a coating (asphalt-based) that is either sprayed on or hand applied to the foundation walls. Waterproofing membranes are rolled on, purpose-made products that are used to divert liquid water down foundation walls and into your Weeping Tile. Free Draining Backfill Aggregate that is placed around your home’s foundation. This aggregate is usually uniformly graded to ensure that there are voids between all of the individual stones. These voids are what make the backfill a Free Draining Backfill, as water can easily flow through the voids and into the Weeping Tile below. A well graded backfill would not work and would only complicate matters as there would be insufficient voids for water to travel through. Managed Exterior Grading Ensuring that your lawn or adjacent flowerbeds slope away from your home will provide relief as it will make a large impact on the quantity of water flowing into your Weeping Tile during rains. Keeping large shrubs and bushes away from your foundation walls will limit the moisture content in the adjacent soils and will minimize the risk of cracking from root growth. Your home may also have one or more of the following items in addition the four above. If you are building a new home, it should at minimum have the first four items. The final three items are only required in certain areas, depending on the local geography.: Sump Pump A submersible pump that sends accumulated water away from one area (typically a structure’s basement) and into another. Sump pumps are used to protect basements from flooding or in homes built at low (local) elevations. Backwater Valve A Backwater Valve is designed to automatically shut off to prevent leakage out of plumbing fixtures if sewage form an obstructed public sewer backs up the owner’s drain line. Backflow Preventer A Backflow Preventer is used to protect potable water lines from contamination due to backflow, much like a Backwater Valve. If you are set on building a truly waterproof home, you should be prepared for extensive costs and measures that would typically be forgone. You will require the services of a Structural Engineer to design and/or specify the following items: Concrete piers or tie-downs, to resist buoyancy forces and ensure that your home does not float away in a major flooding; Raised window wells; Waterproofing admixtures that are to be used in the construction of your foundation; Waterstops and sealants between structural components; Location of and installation procedures of utilities.
Pandemic Policy – Covid-19 and working with CEL Given the evolving situation around the globe, we are interrupting our usual blog cycle to bring everyone’s attention to our Policy on Pandemic Response. Note that this policy is in effect and will guide how you and our staff interact when you work with CEL until such time as our administration officially stands down from Pandemic Response. Policy on Pandemic Response We have a primary Duty of Care to the Public. During a pandemic we are committed to remaining calm and delivering professional services in a manner adapted to safeguard the well-being of our clients and staff, as well as the public. Upon declaration of a Pandemic, CEL Administration shall implement this policy. Our Messaging to Clients : – Please be aware that we are working to provide continuity of services. When you contact our office, we may ask you some questions prior to attending to site. These are intended to protect our clients, staff, and the general public. Note that our staff are required to practice social distancing. – If you or a household member returned from ANY travel outside of Canada, please do NOT visit our offices or request a site visit from our Staff. Contact our office to obtain suitable engineering support. – We continue to provide services to clients, however we are moving to carry out more of our work by telephone and through the internet. Support to existing project documentation which would normally be carried out by phone will continue to be carried out as a courtesy and thus without cost. Services moved to telecommunications channels due to the situation shall remain as chargeable fee-for-service engagements. Where appropriate, site visits will be carried out remotely using telephone/computer and requests for photographs. All work which may be completed remotely shall be carried out remotely. Operational Changes : Staff shall : – avoid unnecessary physical contact. This means no hand shaking, etc. – take what precautions are needed to in order to feel comfortable (ie : the exchange of business cards can be replaced with the exchange of information or sharing of contacts.) – when arranging for a site visit, ask if the client or anyone at the location has travelled outside of Canada or felt ill in the last two weeks. If they have, carefully weigh whether the site visit is prudent. – work from home if experiencing any illness of concern, or if anyone of the household becomes similarly sick. Send an email with details to admin@celottawa.ca. This shall continue until they feel well for a period of two weeks. – where the federal government orders staff to work from home, so shall we. Our firm is well placed to continue operations remotely. CEL’s Expectations In the event of a pandemic, we all have a role to play in reducing the spread of infection. Measures developed for managing influenza outbreaks are a good baseline. Implement measures as recommended by the Public Health Agency of Canada and local officials. At a minimum, we expect staff to: • practice social distancing as much as possible • wash hands often with soap and water for at least 20 seconds • cough or sneeze into a tissue or the bend of an arm, never the hands, and wash hands afterwards • avoid touching the eyes, nose, or mouth, etc with unwashed hands • clean high-touch surfaces frequently
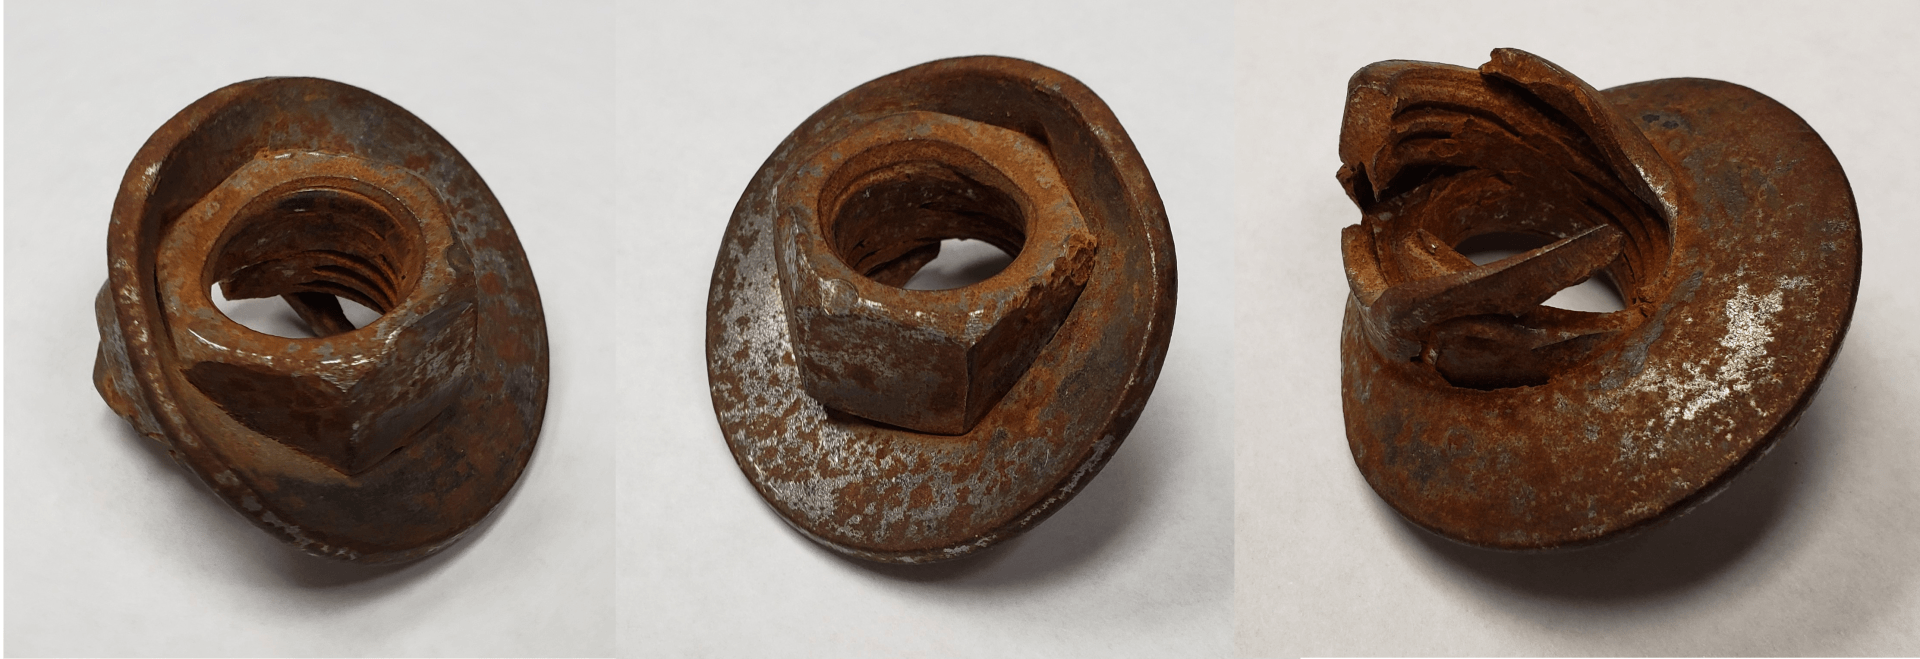
Fastening Matters: The fix is in. We see a lot of connections in our work. Not all of these work well, or are what they should have been, particularly existing conditions that never met any kind of engineering or manufacturer specification. While we see some connections that are entirely incorrect, most often these connections are well built poor performers. The person putting them together made common errors, didn’t understand the connection, and/or the oversight was simply deficient. Let’s discuss some common errors, after which we’ll offer some handy tips. Hanger Nails are Hazards Most of the time, a contractor installing a timber joist hanger simply fills all the holes with Hanger Nails. Why not? They are for hangers, right? Well yes, and no… So called “Hanger Nails” are short (1 1/2”) specialty fasteners needed for rare issues and the occasional specified location. They should not be your go to nail. When you install them in a hanger, you get a lower strength than if you’d saved yourself the money and put in a common, and “Hanger Nails” can never be used in a toe nail position, even if through a hanger. Take a look here for more details: https://www.strongtie.com/products/connectors/wood-construction-connectors/technical-notes/fastener-types-and-sizes Here’s a great post in a home inspector’s blog discussing this in detail: https://www.constructionprotips.com/departments/home-inspector-tales/how-to-correct-improper-joist-hanger-nails/ Screwed Up We see a lot of hangers with regular screws, drywall screws, or deck screws. There is a reason the typical screw is called a “machine” screw. They aren’t for buildings, and they certainly are not for timber hangers. If you’re connecting wood to wood, the right fastener is a nail. Screws are for decks, or are specialty products that you don’t need to build a normal structure. Once in a while, a specialty timber connector requires screws; take a look at those screws sometime: They are a very special design, with large shanks and not at all like a machine screw. Don’t use them unless you have the need to do so in writing. Not all bolts are equal Structural bolts are black, heavy hex, bolts. They have heads far larger than you are used to seeing, or are special fasteners made for wood applications like Coach Bolts and Lag Bolts. Coach and Lags are A307 bolts and nearly always come with a Hot Dip Galvanized coating. They are exclusively for wood, often without any steel involved. So what do you use when there is steel involved? Sadly, most of the time, the same bolts that go on cars and trailers get used. They aren’t up to the job, and are unsafe. The steel material specs are nearly the same, but everything else is meant for an easily accessible, visually inspectable, short term service use. A bolt in a car or trailer may have to last ten years of constant use. A bolt in a building may have to serve 50, 80, more than 100 years. They are not equal challenges, and material engineers treat them differently. We very commonly see bolts on site that don’t meet the requirements of the code. This isn’t a minor issue, but it is easily avoided with a little knowledge. If your bolt is “bright”, you’re being dim. We’re unaware of any structural bolt available with the common bright zinc coating. If your bolt has a shimmer, or a head that accepts a wrench and isn’t much thicker than the wrench, it is the wrong bolt until proven otherwise. We’ll put our money where our internet mouths are: Call our team, show us the bolt and the proof, and lunch is on us. Tips and Tricks: Nail it. The standard nail in use is the “Common”. You also see a lot of Ardox (twisted along the length). Both of these nails are well made, quality products, mass produced and easily found for good prices. Use them. When in doubt, use a common. If you’re outside, you a Hot Dip Galvanized common nail. You rarely need anything more, and if the nail is longer than the piece into which you’re driving, clinch the nail on the back. Most of the time, it is as simple as using a common nail. Don’t screw up. Unless you’re looking at a specification that calls for screws, don’t use screws. Even specialty screws can be hard to get right and confusing for all but the most experienced designers and knowledgeable contractors. If you don’t have someone running the numbers, then run from the screws. Bolt with Caution. When you have steel on your project, have the fabricator apply your nailers (timber bolted to the beam in order to accept nails on site) and prepare you a kit with the fasteners you need. The shop will have easy access to the right heavy hex bolts, and the price you pay will likely be little different than running around for the parts… Besides; We’ve seen shops throw in the bolts for free to attract you back. Let them help you; lean on your fabricator friends. We’re going to leave you with a little visual hint as to what happens when you get fastenings wrong. This one happens to be what happens when you install an SAE 325 bolt instead of a proper structural heavy hex bolt (ASTM A325).
Reserve Fund Studies – Terms Matter We deal with both existing and new condominiums. When we are dealing with older Condos, we frequently find that they have too little money to take care of the problems that are coming up on their facilities. But they have had Reserve Fund Studies carried out. Often good ones. By excellent engineering firms, with professionals who care, cared about the clients, and did their best. So what happened? Thirty year durations happened. Boards asking for the legal minimum happened. A reluctance to allow engineers and others involved in the long term maintenance and care of the building to get real about their reports happened. Reserve Fund Studies which have study durations shorter than the design life of major systems (ie: Concrete structures range from 50 to 80 years expected service life) happened. Most of those systems can be expensive to maintain and are usually prohibitively expensive to replace. Legal minimum reports happened. A professional engineer with the appropriate training and experience is needed. Several of them. Most professionals are only really qualified to look at part of your building, and the condo industry has been accepting reports written by one, maybe two engineers. Legal consequences exist for legal minimums as well. Don’t take our word for it. Here’s what one major Condo Law firm has to say in the matter: https://davidsoncondolaw.ca/reserve-funds-the-limits-of-a-30-year-study/ So: What can you do? You get what you pay for. A building has Structural, Civil, Mechanical, Electrical, Fire, and Building Envelope systems, at a minimum. So pay for a team that represents those specialties and can really get to know your systems. Let your report be thorough. Don’t limit your engagement to only the replacement of items as they break, which is the primary role of the standard legal minimum RFS. Let a group of maintenance and restoration engineers look under the hood of your asset. Treat your asset like a valuable asset. Come and ask us for a proposal to undertake your next Reserve Fund Study. You might be surprised what difference a little different thinking can make.